Introduction to replacing valve cover gasket
replacing valve cover gasket engine or oil stains on your driveway? Perhaps it is time to take action. A damaged valve cover gasket is one of the most common reasons for this. Replacing this small part of your car is easy and can save you from larger problems. It will help maintain the engine’s performance and will save you some money by improving the gas consumption of your car.
On many occasions, car owners do not attempt DIY repairs because they are not confident that they have the needed skills or the right tools. Do not be afraid. Replacing valve cover gasket is one of the easiest car repairs. With some basic steps, you can stop that leak, and earn some cash from saving on gasoline. Let’s get to all of the critical steps needed to be taken to get that car valve cover gasket replaced so you can get back on the road.
Signs that your valve cover gasket needs replacing
The health of an engine is indicated by the symptoms it shows. The most basic of symptoms that the valve cover gasket may replacing valve cover gasket is leaking oil. If you find oil collecting underneath your car, you should check it out.
An additional sign of a leaking valve cover gasket is the oil film around the cover edge. This suggests the valve cover gasket is failing.Absent a visible burn oil symptom, a sign of leaking oil is a smoke odor from the engine. Lehman oil escaping the oil pan may burn on the hot engine parts, leading to a smoke odor.
The absence of smoothreplacing valve cover gasket isreplacing valve cover gasket. This may, in part, be due to the leaking valve cover causing the oil in the engine to be used faster.These symptoms, if not acted on, may result in larger and more serious repairs in the future.
Steps to replace a valve cover gasket
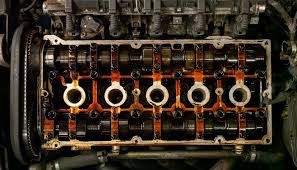
Remove anything in the way of the valve replacing valve cover gasket be hoses or parts of the air intake. Remember to container all the screws and bolts as that will be useful later. Using your socket set, loosen and subsequently remove the bolts connected to the valve cover. Then remove the cover and check both the cover and the old gasket for any possible damage.
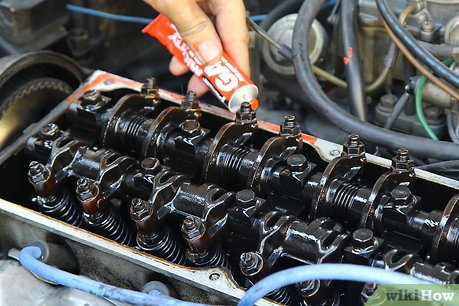
Using either a gasket replacing valve cover gasket , remove any residue from both surfaces. Cleaning surfaces thoroughly will allow for a better seal with the new gasket. Attach the new valve cover gasket in the appropriate channel, making sure it fits snugly and will not move as you reassemble in reverse order of disassembly.
Tools and materials needed for the job
Prior to replacing a valve cover gasket, appropriate tools and materials should first be acquired. Basic hand tools, consisting of wrenches and sockets, should be utilized in removing the valve cover securing bolts.
Equally important are torque wrenches. These tools make certain every bolt is fastened according to the proper specifications such that is outlined by the manufacturer. This almost guarantees that leaks will not be an issue at a later time.
An effective scraper will make surfacing the valve cover gasket with the old gasket material quickly. Surfaces that are to be joined and sealed should be clean and dry. This affords a tight seal to be made. Having the proper safety equipment will also make the job easier. Having completed every task will make the process easier and faster.
Tips and tricks for a successful replacement
For a little added leak protection, consider RTV sealant on the corners of the new gasket. Remember that less is more with sealant; it can cause new problems if too much is applied.
When old gaskets are being removed, some patience is replacing valve cover gasket the surfaces from being scraped too aggressively. This will help you avoid unnecessary troubleshooting on problems that may arise from unexpected results.
Benefits of DIY valve cover gasket replacement
Performing the task of doing your own valve cover gasket is rewarding at the level of understanding your own engine more than just the basics. You will learn how the components of the engine relate to and interact with each other.
There is also the additional factor of replacing valve cover gasket. Professional mechanics will charge you for the repairs and parts, and often the repairs will cost more than the parts. You can purchase the materials for under half the price of the repairs and do the repairs yourself. In many instances, waiting for shop hours and appointments can be time-consuming.
Cost comparison between DIY and professional replacement
Replacing valve cover gasket of the factors that come into play when dealing with the replacement of a valve cover gasket. A professional mechanic will usually charge anywhere between $200 $500 due to variances in labor rates and the complexity of the vehicle. This captures both the parts and the service being provided.
However, the savings you can make when doing it yourself are considerable. The replacement gasket will set you back $20 to $50, and, assuming you have the basic tools for mechanic work, the only additional expenditure will be for the special tools needed, which are often inexpensive. Keep in mind that doing it yourself will require a larger time commitment. This can be a fun weekend activity for the mechanically inclined, but for the majority of people, this is an undesirable time commitment.
Conclusion
Repairing your own vehicle will also create a bond between you and your vehicle.The difference between doing repairs versus having a professional do the repairs is a huge difference. There are times when professional vehicle repairs are necessary; however, there are times when doing the repairs ourselves can be beneficial in time and money.
Taking on DIY replacing valve cover gasket a valve cover gasket, will save you money and also give you the confidence and independence of owning a car and tackling the problems that come with it head-on.